It’s funny how I keep covering the same themes as I write about the images in this series, because the issues I keep covering aren’t necessarily related to the subject matter. My shooting that day was all about lines, shadows, perspective, above/below and other things you would expect when shooting underneath elevated subway tracks. Meanwhile my processing and my discussion about the images has been all about just getting the darn things straight.
It started as a joke in the first image where I kidded myself about my tendency to fail to get straight horizons, then continued in this image where I criticized my tendency to intentionally shoot from an angle when a straight approach would be better. I also showed off a different shot from a side angle that I did like, and then several shots between that last image and today’s, that were not flawed because of anything I did, but that had significant lens distortion that I worked hard to correct.
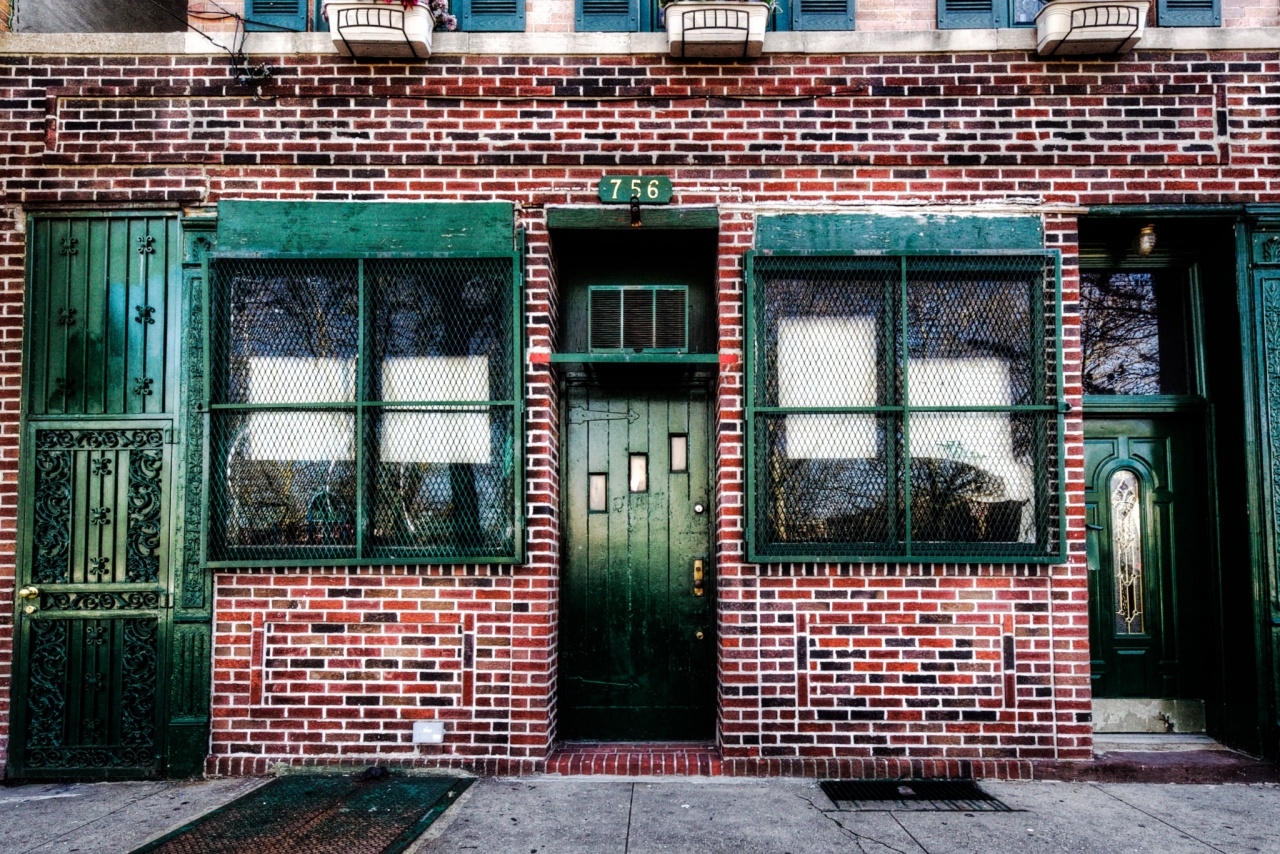
With all of that behind me, I nearly wanted to give up when I looked at this image in Aperture last night before starting work on it. The near-original version is below, which is the simple HDR conversion. The horizon is close, but runs downhill to the right, my camera is pointing a bit to the right even though I intended it to be straight on, and both of these enhance the lens distortion from the wide angle lens.
All I wanted was a simple straight on shot of this brick house with the green doors and windows and the flower planters above and I messed it up in multiple ways. But I managed to salvage it with what I’ve learned in the past 10 days or so practicing so much with the lens correction tool in Photoshop. For the first time, I actually used a combination of vertical correction, horizontal correction, a horizon fix, and lens distortion corrections, all in one image and with some sense of why I was using each tool. The result would be better if I just got it right in the field. For one thing, I wouldn’t have had to lose the flowers in the window boxes on the second floor. Plus, the doors at the sides both lean out, which I might have been able to correct if I did not also have to correct so many other problems. But the process I went through to salvage something form this was rewarding.
By the way, I should also mention why I processed this as an HDR. Unlike many of the other shots in this series, this one does not have a wide tonal range of highlights and shadows so it is a less obvious HDR candidate. But I also find when you apply the HDR process to photographs shot in midday, with boring flat light, the result can actually enhance some of the minor light/shadow variations that would come up flat in a single image.


Scott
28 Apr 2011Great job showing the power of a T/S lens!
Scott
28 Apr 2011Oh wait.. no T/S. All PS! Nicely done dude!
Jim Denham
28 Apr 2011Wow, great job straitening Mark! Like the processing too! Well done!
Jim Denham recently posted..Redneck Legos
Jim Nix
28 Apr 2011nice work Mark! Jim
Chris Nitz
28 Apr 2011Thanks for sharing the power of all those corrections that PS has. I only ever use the lens corrections, but it sounds like I need to learn the verticle/horizontal correction tools as well. I also like why you used HDR on this image as well. Great tips today!
Chris Nitz recently posted..Lookin at You
Chris Frailey
28 Apr 2011Great tips on the processing of this shot.
Chris Frailey recently posted..Silver Solarium
Chris Kenison
28 Apr 2011Mark, this is a GREAT shot! Love the colors and contrast between the green and red. I love the Lens Correction tool in PS… so handy! Great shot!
Chris Kenison recently posted..Ghost Towns – High Ore – 1
Jessa
28 Apr 2011I love the finished product! It’s interesting to hear the stories behind getting these great shots. The colors and tones in this are great. Beautiful work! Thanks for sharing. 🙂
Toad Hollow Photography
28 Apr 2011WOW Mark, you are a master in post-processing, that’s an amazing result! I love the shot big time!
Toad Hollow Photography recently posted..Bear Mountain
Wayne Frost
28 Apr 2011It is a shame that the flowers had to be lost, I’ve been in the same boat a few times when trying to straighten things out in post processing. It is then that I think “if only I had framed it less tightly” I am always trying to fill my sensor edge to edge with my subject, but I need to remember to move away from the subject if I am not able to get all of it in the frame “head on”, but that can be problematic if that means moving in to the street some times.
Wayne Frost recently posted..A Hard Life
Mark
28 Apr 2011I appreciate the response to this. Wayne makes a good point. If you look at the original, I did leave a lot of extra information in on every side but the top, which I always intended to cut out. When you have a very specific frame in mind, as I did here, it can really save you if you shoot some extra space on all sides. Even if you don’t have to make such massive adjustments to various angles, it’s better to capture more than you need than not enough. You can always crop out, but you can’t add in what isn’t there.
Ryan Sexton
28 Apr 2011Great job in postproduction, you really gave it more of a symmetric look. I also love the way the green just glows now. The one thing feel missing would be the flowerpots above the doors. Here in Florida we do not ever see flowers on the sides of buildings, so it really stands out to me. I think the pinks and purples would have really popped too. Don’t get me wrong the photo looks great and I understand why you did it.
Steve Beal
28 Apr 2011Very interesting building front – love your crop and processing.
Steve Beal recently posted..Doodletown Stream
Kristi Hines
29 Apr 2011Love the rich, deep green tone on the doorway. It almost looks like wet paint!
Kristi Hines recently posted..Tumbleweed and Graffiti
Justin
29 Apr 2011Thanks for including the original. It is amazing what you can do. Well done!
Dave DiCello
5 May 2011Wow, really love the processing here, awesome deep tones!!