Shooting street photography at night generates special problems beyond those usually facing street photographers. Most of them have to do with light, and most, but not all of them have to do with the relative lack of light. The following is a list of 5 tips for night time street photography. As such, it does not address general street photography issues such as whether to shoot from the hip or how to deal with your anxieties about shooting strangers. Those are legitimate topics but there are lots of other articles and tutorials that address them.
1. Increase Your Exposure Bias
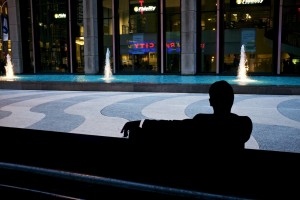
You will be photographing people who are lit randomly. The light might be to the side or even directly behind them. No matter how you set up your exposure metering, there is a good chance that it will lock onto a light source, or at least some area that is better lit than your subject. There are also a number of light sources that directly behind your subjects, and not above them. These include automobile headlights and store front lights. When that happens your subjects will be completely in the shade and non-viewable, unless you increase your exposure bias accordingly. This gentleman was standing in complete shadow, but is visible largely because my camera was set to an exposure bias of +1.0.

I usually have the camera set between +0.3 to +1.0. It depends on where I am and which way I am facing. It helps if you are not facing oncoming car traffic and do not have street lights directly in your camera’s line of sight. As a default, I would suggest +0.7. But check your results while you are out and adjust accordingly.
2. Exposure Trio: Shoot High, Wide, and Slow
So it’s night time. It’s already dark. And now I’ve told you to set your exposure bias as high as +1.0, which is just an additional obstacle. It’s almost as nutty as wearing your sunglasses at night.

How can you possibly get enough light to take pictures at night, outdoors, and with of course, no flash? You’re going to act like a pitcher throwing a change-up with poor control: go high, wide, and slow.
High High ISO. I usually shoot from ISO 1600 to 2500, with 2000 being my default. You’ll either have to deal with noise and pretend you’re intentionally mimicking a grainy film look, or get a good noise reduction tool, and perhaps sacrifice a bit of detail. I do both.
Wide You’re going to need a lens capable of shooting at a pretty wide open aperture setting at the length you will be using it. This probably means a prime lens. I usually use a prime in my street photography, and it is usually set between F/1.4 and F/2.2. You might be able to push it to 2.4 or even 2.8 but you’ll need to adjust one of the other setting even further to do so.
Slow Normally with subjects who are not posing and staying still for your convenience, you want a shutter speed with some snap, at least 1/125, 1/250, or even higher. You’re not going to get it. Most of my night time street shots are taken at shutter speeds as low as 1/40 and at best I might get 1/80. There will be motion blur. It’s one reason why I decided to start a series of photos of people standing still at bus stops, and why many of my crosswalk shots focus on people waiting at the edge of the crosswalk rather than moving through it. But sometimes I shoot photos of people walking at night, and a touch of blur just adds a sense of energy.

As I write this, it occurs to me that shooting at shutter priority, or even better, using the automatic ISO adjustment feature on your camera (if it has that feature) would be a good idea, but I always just shoot aperture priority. I check and if it appears that the shutter speed is dancing around the 1/40 to 1/80 range, I’m happy.
3. Shoot Raw
Having pushed every light setting pretty far, you are going to have to shoot raw. Most photographers I know do so in most circumstances, but it is absolutely necessary for night time street photography, including for those of you who don’t like doing so. It will help when you want to reduce noise. It will help when you want to pull back blown out highlights and underexposed shadows, and you will have a lot of both. The data just is not there to fix them in a JPEG. Plus, are you one of those photographers who sometimes makes a mistake with your camera settings? Of course you are. I am. One night I went out and accidentally moved the exposure bias the wrong way, so I was shooting at -1.0 instead of +1.0. Fortunately I noticed after a few photos and fixed it, but one of the results I had was this image. This is ISO 1600, f/2, and 1/500 with an exposure bias of -1.0. This is exactly how the raw image looks in Aperture.


4. Go Long
Are you wedded to the street photography ethos that you have to get close and intimate with your subjects? Sorry. Move back. You can push it sometimes and get lucky, but “ye cannae change the laws of physics.” I use a Nikon D700 and an Olympus E-PL1. Let’s use the D700 as an example. Let’s say I slap on a nifty 50, set it at f/2, and stand 6 feet from my subjects. My depth of field is a total of 6 inches. Good luck with that. So let’s change it to an 85mm, also at f/2 and I stand 25 feet away. Now my DOF is a bit more than 3 feet. I can work with that. Let’s say I stand, oh 30 feet away, maybe across the street from some people waiting at the edge of a crosswalk for example. Now my DOF is now more than 4 feet deep. This shot was at f/1.4, and there are people standing three rows deep all in focus.

Go ahead, play with your camera and lens set up here. Because we are working at wide aperture settings, we are going to have a relatively narrow DOF no matter what. But, keeping other factors constant, standing back increases your DOF, and adding focal length reduces it. I have a great 135mm lens. At 30 feet and f/2 it only has a DOF of only 1.78 feet. Also, it doesn’t focus so well in low light, so I have 2 reasons not to use it much for night time street work.
Of course, sometimes you get lucky. Take your shots and hope. When you can get close and in focus, you also get better bokeh. Here are a couple of examples, and one of them has a subject who is only partly in focus, but look at those backgrounds. Is the trade off worthwhile? It’s your call.


I won’t run through the numbers here, but my E-PL1 has a wider DOF at close range than the D700 does, under similar focal lengths and aperture settings. I believe it has to do with both sensor size and the distance between the lens and the sensor. But very close up it can still be pretty narrow. Plus it doesn’t focus as reliably as the D700 in low light conditions. In photography, everything is a trade-off.
5. Hide Your White Balance Issues With Black And White
Most people seem to like street photography in black and white anyway, so this one could be a freebie. You might have been planning to do it in any event. Yet it is also a bit practical because getting a proper white balance under night time street lighting is sometimes impossible. Think about it. Your light sources are a mixture of different types of both tungsten and fluorescent, and some of them are moving. Your field of view might have some areas lit by street lights, others by store fronts, and others by car head lights. What is the right WB setting? There isn’t one. Even before converting to black and white, it helps to get something that approximates the right WB setting, so try to adjust it as best you can. This is especially useful as you advance in your black and white post processing skills and start using color filters or adjusting the RGB light levels in your black and white images. But do your WB adjustment quickly and don’t go crazy, or you will go crazy and waste a lot of time. Settle for “good enough for government work,” or “close enough for rock and roll,” or some such thing. Then just convert to black and white and hide those weird mixes of yellows and blues.
That’s it. Good luck, have fun, stay safe, and make some great shots.
Jim Denham
18 Feb 2011Wow, great tips Mark! I hope to try these out some time when I can get out at night! Good stuff!
Toad Hollow Photography
18 Feb 2011You are a constant source of information, inspiration and learning for me, Mark. Thanks for taking the time to compile this absolutely great information.
Toad Hollow Photography recently posted..House Demolition
John Sotiriou
19 Feb 2011Terrifically well written article, Mark. Thanks for sharing.
Pingback: Bus Stop No. 88 - Too Much Glass » Too Much Glass
Pingback: Tips for Night Time Street Photography » studio3240.com
greg
19 Nov 2011Good advice sort of. And then i see your photos which honestly are horrendous. There is no sense of composition at all. You have taken pictures but they definitely aren’t “photos.”
Mark
19 Nov 2011Hi greg. While I don’t love getting negative comments I do welcome them. I would prefer that you be a bit more specific and constructive in your comments, and maybe use a bit more grace. But thank you anyway.
Pingback: Citibikes in Snow at Night - Too Much Glass